香港100M服务器
采用100M BGP混合带宽,可选15M或25M电信CN2带宽,搭配联通、移动直连线路,兼顾内地访问与国际网络连接,适合企业网站、跨境电商及应用部署等业务。


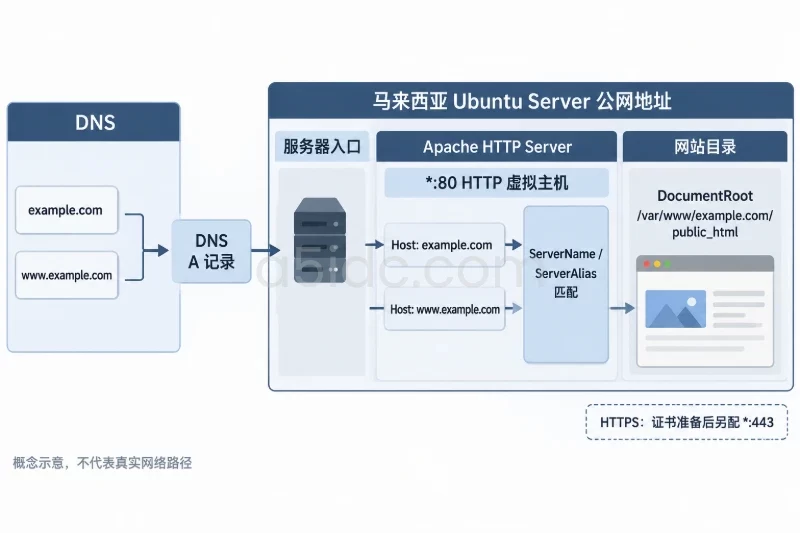
目标是让 Apache 在同一台 Linux 服务器上根据请求中的域名选择对应站点目录,并通过本机、指定 IP 和实际域名三层方式确认访问链路正常。以下示例以 example.com 为站点域名、/var/www/example.com/public_html 为网站根目录,仅配置 HTTP 端口 80,不涉及 HTTPS 证书和应用程序部署。
示例命令覆盖使用 systemd 的 Ubuntu/Debian 与 RHEL 系列发行版。Debian 系列的服务名通常为 apache2,配置目录为 /etc/apache2;RHEL、Rocky Linux、AlmaLinux 等系统通常使用 httpd,配置目录为 /etc/httpd。正式执行前,请将示例域名和服务器 IP 替换为实际值。
A5数据提供中国香港、美国、日本、韩国、中国台湾、新加坡和马来西亚等地区的物理服务器,可承载 Apache 网站、业务后台、数据库及接口服务。产品覆盖 Xeon Gold、AMD EPYC 等平台,并提供 SSD 或 NVMe 存储、不同带宽线路和多 IP 方案,便于结合访问地区、程序负载与站点规模搭建相应的 Linux Web 服务环境。
执行人员需要具备 sudo 权限,服务器应能正常访问软件仓库。先确认系统类型和当前网络监听情况:
cat /etc/os-release
检查 80、443 端口是否已被其他服务占用:
sudo ss -ltnp | grep -E ':(80|443)\b' || true
如果 80 端口已经被 Nginx、旧版 Apache 或其他程序监听,不要直接执行停止或杀进程命令。先确认进程和业务归属:
sudo ss -ltnp
sudo systemctl --type=service --state=running
如果已有网站正在使用该端口,应在业务低峰期确认是否可以增加虚拟主机,避免停止服务导致其他站点中断。
验证标准:
example.com 和可选的 www.example.com。域名需要配置指向服务器的 A 记录。例如:
| 域名 | 记录类型 | 指向 |
|---|---|---|
example.com | A | 服务器公网 IPv4 |
www.example.com | A 或 CNAME | 服务器公网 IPv4 或 example.com |
如果服务器位于云平台,还需要在云平台安全组或外部防火墙中允许 TCP 80。操作系统防火墙和云平台安全组是两层独立控制,放开其中一层并不代表外部访问一定成功。
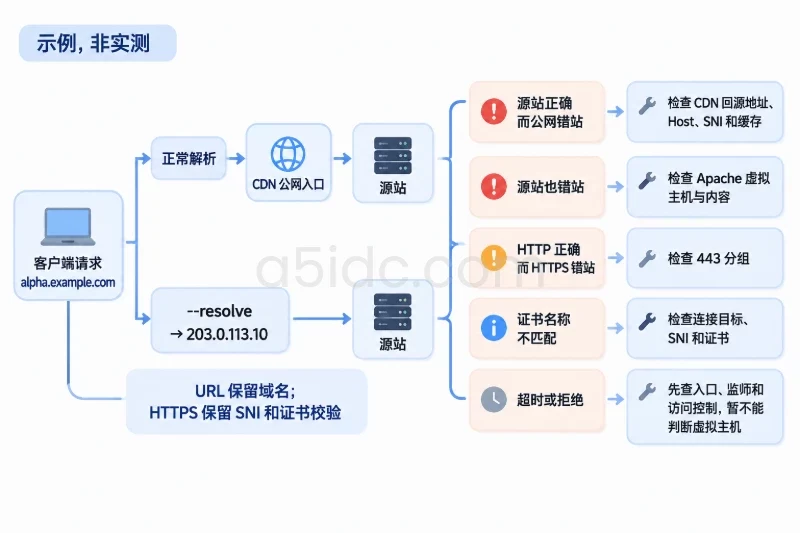
如果 DNS 尚未生效,可以先使用 Apache 的 Host 请求头或 curl --resolve 验证,不必等待 DNS 传播完成。
如果服务器上已经运行 Apache 或存在其他站点,配置前应备份相关目录。备份会占用少量磁盘空间,但不会改变当前服务。
Ubuntu/Debian:
sudo install -d -m 700 /root/apache-vhost-backup
sudo cp -a /etc/apache2/sites-available /root/apache-vhost-backup/
sudo cp -a /etc/apache2/sites-enabled /root/apache-vhost-backup/
RHEL 系列:
sudo install -d -m 700 /root/apache-vhost-backup
sudo cp -a /etc/httpd/conf.d /root/apache-vhost-backup/
以下步骤只创建新的 example.com 配置文件,不覆盖其他站点配置。若已有同名配置,应先查看内容,再决定是修改、备份后替换,还是使用其他文件名。
安装 Apache 和用于验证 HTTP 响应的 curl:
sudo apt update
sudo apt install -y apache2 curl
设置 Apache 开机启动并立即启动:
sudo systemctl enable --now apache2
安装 httpd 和 curl:
sudo dnf install -y httpd curl
设置服务开机启动并立即启动:
sudo systemctl enable --now httpd
Ubuntu/Debian:
sudo systemctl status apache2 --no-pager
sudo apache2ctl -t
RHEL 系列:
sudo systemctl status httpd --no-pager
sudo httpd -t
正常情况下,服务状态中应出现 active (running),配置检查结果应为:
Syntax OK
如果服务启动失败,不要继续写入虚拟主机配置。先按照后文的服务启动失败部分检查端口冲突和配置错误。
虚拟主机需要一个明确的 DocumentRoot。本例使用:
/var/www/example.com/public_html
创建目录并写入一个静态测试页面:
sudo install -d -m 755 /var/www/example.com/public_html

sudo tee /var/www/example.com/public_html/index.html >/dev/null <<'EOF'
<!doctype html>
<html lang="zh-CN">
<head>
  <meta charset="utf-8">
  <title>example.com</title>
</head>
<body>
  <h1>example.com Apache virtual host is working</h1>
</body>
</html>
EOF

sudo chmod 644 /var/www/example.com/public_html/index.html
这些命令只作用于新创建的示例目录。不要在不确认业务需求的情况下,对已有网站执行递归 chmod 777 或递归修改所有权。静态文件通常只需要目录可进入、文件可读取;如果应用需要上传文件,应单独规划可写目录,不要让整个网站根目录可写。
查看目录权限:
namei -l /var/www/example.com/public_html/index.html
ls -ld /var/www/example.com /var/www/example.com/public_html
ls -l /var/www/example.com/public_html/index.html
常见的可读状态类似:
drwxr-xr-x ... /var/www/example.com
drwxr-xr-x ... /var/www/example.com/public_html
-rw-r--r-- ... /var/www/example.com/public_html/index.html
如果 RHEL 系统启用了 SELinux,除了传统 Unix 权限外,还需要检查安全上下文:
getenforce
如果结果为 Enforcing,为该网站目录配置 Apache 静态内容类型。首次执行时,如系统没有 semanage,先安装工具:
sudo dnf install -y policycoreutils-python-utils
然后执行:
sudo semanage fcontext -a -t httpd_sys_content_t '/var/www/example.com(/.*)?'
sudo restorecon -Rv /var/www/example.com
验证上下文:
ls -lZ /var/www/example.com/public_html/index.html
如果后续需要让 Apache 写入上传目录,应仅对指定上传目录使用合适的可写 SELinux 类型,并配合最小权限设计。本例是静态站点,不需要开放写权限。
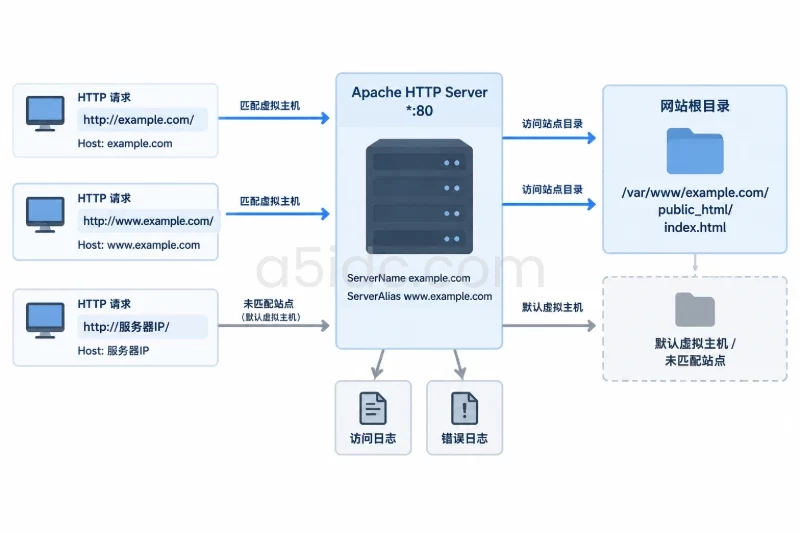
Apache 通过请求中的 Host 头匹配 ServerName 或 ServerAlias。因此,直接访问服务器 IP 不一定能验证指定站点;访问域名或手动指定 Host 才能确认虚拟主机匹配是否正确。
创建站点配置:
sudo tee /etc/apache2/sites-available/example.com.conf >/dev/null <<'EOF'
<VirtualHost *:80>
    ServerName example.com
    ServerAlias www.example.com

    DocumentRoot /var/www/example.com/public_html

    <Directory /var/www/example.com/public_html>
        Options FollowSymLinks
        AllowOverride None
        Require all granted
    </Directory>

    ErrorLog ${APACHE_LOG_DIR}/example.com_error.log
    CustomLog ${APACHE_LOG_DIR}/example.com_access.log combined
</VirtualHost>
EOF
配置项作用如下:
ServerName:站点的主域名。ServerAlias:允许使用同一站点响应的其他域名。DocumentRoot:网站文件根目录。Require all granted:允许 Apache 读取并响应该目录。AllowOverride None:不读取 .htaccess,便于明确控制配置;如果应用明确依赖 .htaccess,需要单独评估,不应直接改为宽泛权限。ErrorLog 和 CustomLog:分别记录错误日志和访问日志。启用站点配置:
sudo a2ensite example.com.conf
a2ensite 通常只创建从 sites-enabled 指向 sites-available 的软链接,不会删除其他站点。
RHEL 系列通常会自动加载 /etc/httpd/conf.d/ 目录中以 .conf 结尾的文件。创建配置:
sudo tee /etc/httpd/conf.d/example.com.conf >/dev/null <<'EOF'
<VirtualHost *:80>
    ServerName example.com
    ServerAlias www.example.com

    DocumentRoot /var/www/example.com/public_html

    <Directory /var/www/example.com/public_html>
        Options FollowSymLinks
        AllowOverride None
        Require all granted
    </Directory>

    ErrorLog /var/log/httpd/example.com_error.log
    CustomLog /var/log/httpd/example.com_access.log combined
</VirtualHost>
EOF
不要把 RHEL 配置中的日志路径直接复制到 Debian,也不要把 ${APACHE_LOG_DIR} 直接复制到 RHEL;两类系统的日志目录变量和默认布局不同。
Ubuntu/Debian:
sudo apache2ctl configtest
sudo systemctl reload apache2
RHEL 系列:
sudo httpd -t
sudo systemctl reload httpd
只有在检查结果为 Syntax OK 时才执行重新加载。reload 通常不会中断已建立的连接,比直接 restart 更适合配置变更。
查看 Apache 已识别的虚拟主机:
Ubuntu/Debian:
sudo apache2ctl -S
RHEL 系列:
sudo httpd -S
输出中应能看到类似以下信息:
*:80 is a NameVirtualHost
     port 80 namevhost example.com (.../example.com.conf:1)
             alias www.example.com
不同 Apache 版本的输出格式可能略有差异,重点是确认 example.com 已绑定到 *:80,且配置文件路径是刚创建的文件。
Ubuntu 使用 UFW 时,先查看当前状态:
sudo ufw status verbose
确认当前规则后再放行 HTTP:
sudo ufw allow 80/tcp
RHEL 系列使用 firewalld 时:
sudo firewall-cmd --state
sudo firewall-cmd --permanent --add-service=http
sudo firewall-cmd --reload
防火墙调整会改变服务器的入站访问范围。执行前应确认 SSH 管理端口已有放行规则,避免误操作导致远程失联。若 UFW 或 firewalld 未启用,不要为了本示例贸然启用整套防火墙策略。
验证规则:
sudo ufw status numbered
或:
sudo firewall-cmd --list-services
应能看到 80/tcp 或 http。如果云平台安全组未放行 TCP 80,操作系统防火墙检查通过后,外部访问仍可能超时。
从客户端执行:
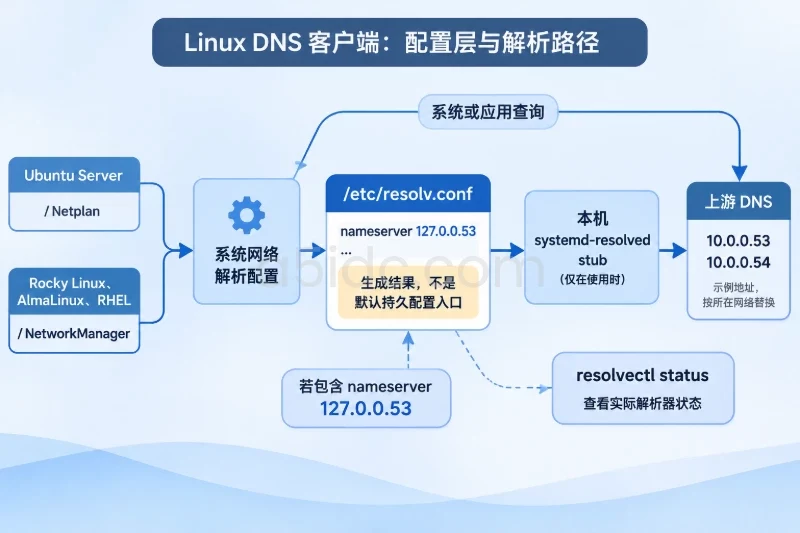
getent ahostsv4 example.com
如果安装了 DNS 查询工具,也可以执行:
dig +short example.com A
dig +short www.example.com A
返回结果应包含服务器实际公网 IPv4。若返回旧 IP、空结果或其他地址,应先修正 DNS 记录,再进行公网访问验证。
先验证 Apache 进程和 80 端口是否能响应:
curl -i http://127.0.0.1/
如果已经配置了虚拟主机,直接访问 127.0.0.1 时发送的 Host 通常是 127.0.0.1,可能命中默认虚拟主机。因此,这一步只能证明 Apache 能响应,不能单独证明 example.com 配置正确。
在服务器本机执行:
curl -sS -D - -H 'Host: example.com' \
  http://127.0.0.1/ \
  -o -
测试别名:
curl -sS -D - -H 'Host: www.example.com' \
  http://127.0.0.1/ \
  -o -
预期结果应包含:
HTTP/1.1 200 OK
Content-Type: text/html
响应正文中应出现:
example.com Apache virtual host is working
如果访问 127.0.0.1 成功,但指定 Host 后显示默认页面,重点检查 ServerName、ServerAlias、站点是否启用以及 apachectl -S 的匹配结果。
在客户端或服务器上设置测试 IP。以下 203.0.113.10 仅为文档示例地址,请替换为实际服务器 IP:
SERVER_IP=203.0.113.10

curl -sS -D - \
  --resolve example.com:80:${SERVER_IP} \
  http://example.com/ \
  -o -
--resolve 会让 curl 连接指定 IP,同时仍然发送 Host: example.com,适合在 DNS 尚未更新时验证域名虚拟主机。
测试 www 别名:
curl -sS -D - \
  --resolve www.example.com:80:${SERVER_IP} \
  http://www.example.com/ \
  -o -
这一步的判断方式如下:
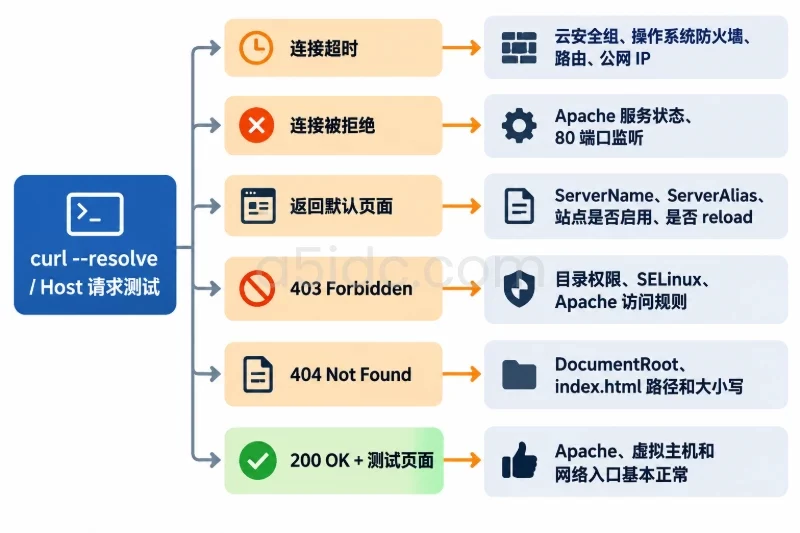
200 OK 且正文是测试页面:Apache、虚拟主机和网络入口基本正常。403 Forbidden:重点检查目录权限、SELinux 和 Apache 访问规则。404 Not Found:检查 DocumentRoot 和 index.html 的路径、大小写。确认 DNS 已指向正确 IP 后,执行:
curl -i http://example.com/
curl -i http://www.example.com/
也可以在浏览器中分别打开:
http://example.com/
http://www.example.com/
浏览器地址栏中的域名必须与 ServerName 或 ServerAlias 一致。直接打开:
http://服务器IP/
只能验证默认虚拟主机或未匹配请求的处理结果,不能替代域名访问验证。
Ubuntu/Debian:
sudo tail -n 50 /var/log/apache2/example.com_access.log
sudo tail -n 50 /var/log/apache2/example.com_error.log
RHEL 系列:
sudo tail -n 50 /var/log/httpd/example.com_access.log
sudo tail -n 50 /var/log/httpd/example.com_error.log
成功访问后,访问日志中应出现对应请求路径和状态码,例如:
"GET / HTTP/1.1" 200
如果客户端显示超时,同时目标站点访问日志没有任何记录,请优先检查网络入口,而不是继续修改 Apache 配置。
先检查配置语法:
# Ubuntu/Debian
sudo apache2ctl configtest

# RHEL 系列
sudo httpd -t
再查看服务日志:
# Ubuntu/Debian
sudo journalctl -u apache2 -n 80 --no-pager

# RHEL 系列
sudo journalctl -u httpd -n 80 --no-pager
如果出现 Address already in use,说明 80 端口已经被其他进程占用:
sudo ss -ltnp | grep ':80'
不要直接结束占用进程,应先判断其是否承载其他网站。如果是旧 Apache 实例,可能是配置文件重复;如果是 Nginx 或应用服务,则需要重新规划端口和反向代理关系。
依次检查:
sudo apache2ctl -S
或:
sudo httpd -S
确认以下内容:
ServerName 完全一致。www.example.com 是否写入了 ServerAlias。a2ensite example.com.conf。reload。如果命令行使用 Host: example.com 能返回正确页面,而浏览器访问错误页面,通常是 DNS、浏览器缓存或访问的域名不一致。
先查看目录每一级的权限:
namei -l /var/www/example.com/public_html/index.html
目录需要具备执行权限,文件需要可被 Apache 读取。对于 RHEL 系列,再查看 SELinux:
ls -lZ /var/www/example.com/public_html/index.html
如果 SELinux 为 Enforcing,重新执行:
sudo restorecon -Rv /var/www/example.com
必要时查看近期拒绝记录:
sudo ausearch -m AVC -ts recent
不要通过关闭 SELinux 或给网站目录执行 chmod -R 777 来绕过问题,这会扩大文件访问和修改范围。
确认配置中的目录和实际文件一致:
grep -R "DocumentRoot" /etc/apache2/sites-available/example.com.conf 2>/dev/null
grep -R "DocumentRoot" /etc/httpd/conf.d/example.com.conf 2>/dev/null

ls -l /var/www/example.com/public_html/index.html
Linux 路径区分大小写,Index.html、index.HTML 和 index.html 不是同一个文件。若 Apache 返回的是站点自定义 404 页面,还需要进一步检查应用路由;本例的静态测试页面只要求 index.html 存在。
按由外到内的顺序检查:

http 或 80/tcp。0.0.0.0:80 或服务器实际网卡地址。active (running)。查看监听地址:
sudo ss -ltnp | grep ':80'
如果只监听 127.0.0.1:80,外部网卡无法访问,需要检查 Apache 的 Listen 配置和其他加载文件;不要在不了解现有网络设计的情况下直接修改全局监听配置。
完成配置后,至少确认以下项目:
apache2ctl -t 或 httpd -t 返回 Syntax OK。active (running)。apachectl -S、apache2ctl -S 或 httpd -S 能看到 example.com。DocumentRoot 与实际网站目录一致。Host: example.com 请求返回 200 OK。curl --resolve 指定服务器 IP 请求返回目标测试页面。example.com 和需要使用的 www.example.com 均已单独验证。回滚前先确认是否有其他站点共用 Apache。以下操作只撤销本次创建的虚拟主机,不应影响其他站点。
Ubuntu/Debian:
sudo a2dissite example.com.conf
sudo apache2ctl configtest
sudo systemctl reload apache2
确认不再需要该文件后,可以将其移出配置目录保存,不建议直接删除:
sudo mv /etc/apache2/sites-available/example.com.conf \
  /root/apache-vhost-backup/example.com.conf.disabled
RHEL 系列:
sudo mv /etc/httpd/conf.d/example.com.conf \
  /etc/httpd/conf.d/example.com.conf.disabled

sudo httpd -t
sudo systemctl reload httpd
如果回滚前修改了已有配置,应从 /root/apache-vhost-backup/ 中恢复对应文件,然后重新执行配置检查和服务重新加载。网站内容目录不建议随配置一起删除,以免误删后续上传文件或业务数据。
如果 TCP 80 规则仅为本次测试增加,可以撤销:
Ubuntu/Debian:
sudo ufw delete allow 80/tcp
RHEL 系列:
sudo firewall-cmd --permanent --remove-service=http
sudo firewall-cmd --reload
执行前必须确认该规则没有被其他网站使用。DNS 记录回滚也不会立即完成,受 DNS TTL 和缓存影响;如果服务器仍承载其他站点,不应直接删除整个域名或服务器的公共访问规则。
如果 Apache 上还有其他虚拟主机,不要执行以下会影响全部站点的操作:
sudo systemctl disable --now apache2
或:
sudo systemctl disable --now httpd
只有在确认该 Apache 实例没有其他业务,并且需要整体停止服务时,才考虑停止并禁用服务。
本文由A5数据原创发布,转载请注明出处:https://www.a5idc.com/helpcontent/4611.html