香港特惠服务器
三网CN2带宽,提供30M至100M大带宽,保障CN2/CMIN2/CU/PCCW四大运营商线路稳定接入



ModSecurity是开源网络服务器中使用非常广泛的网络应用防火墙。它可以与Apache和NGINX一起使用,以提供对基于Web的应用程序的一些HTTP攻击(如SQL注入和跨站点脚本)的保护。换句话说,这个模块应该被认为是一个必须使用的模块。
使用apt-get安装的NGINX实例无法启用ModSecurity,所以你必须手动启用。我想带你了解一下将这个安全功能添加到NGINX网络服务器的过程。
准备工作:一个正在运行的Ubuntu服务器实例,且拥有sudo权限的用户
一、如何安装必要的依赖关系
首先要做的是安装必要的依赖关系。这可以通过一个命令来完成。
sudo apt-get install -y git build-essential libpcre3 libpcre3-dev libssl-dev libtool autoconf apache2-dev libxml2-dev libcurl4-openssl-dev automake pkgconf zlib1g-dev -y
如果你已经安装了NGINX(从标准库),请使用命令将其删除。
sudo apt-get purge nginx -y。
使用该命令删除所有剩余的依赖关系。
sudo apt-get autoremove -y。
完成后,我们就可以进入ModSecurity了。
二、如何编译ModSecurity
我们必须手动编译ModSecurity。首先,使用命令进入src目录。
cd /usr/src
接下来,用命令克隆最新版本的ModSecurity。
git clone -b nginx_refactoring https://github.com/SpiderLabs/ModSecurity.git
用命令改变到新创建的目录中。
cd ModSecurity
使用autogen脚本配置ModSecurity,如下所示。
./autogen.sh./configure --enable-standalone-module --disable-mlogc
使用以下命令制作并安装ModSecurity。
make
sudo make install
三、如何编译NGINX
不幸的是,我们不能使用标准仓库中的NGINX安装,因为它必须在NGINX支持下编译。用命令改回src目录。
cd /usr/src
下载最新版本的NGINX,目前是1.18.0,但一定要在最新版本上检查,并相应地修改命令。下载源码的命令是
wget http://nginx.org/download/nginx-1.18.0.tar.gz
用命令解压压缩文件。
tar xvzf nginx-1.18.0.tar.gz。
用命令改变到新创建的目录中。
cd nginx-1.18.0
用命令配置支持ModSecurity的NGINX。
./configure --user=www-data --group=www-data --add-module=/usr/src/ModSecurity/nginx/modsecurity --with-http_ssl_module。
最后,用命令制作并安装NGINX。
make
sudo make install
四、如何配置NGINX
现在,我们必须修改默认的NGINX配置文件,以便它知道在哪个用户下运行。
sed -i "s/#user nobody;/user www-data www-data;/" /usr/local/nginx/conf/nginx.conf
接下来,我们需要配置NGINX,让它知道使用ModSecurity。用命令打开NGINX的配置文件。
sudo nano /usr/local/nginx/conf/nginx.conf
在该文件中,将以下部分替换掉。
location / {
root html;
index index.html index.htm;
}
替换为:
location / {
ModSecurityEnabled on;
ModSecurityConfig modsec_includes.conf;
root html;
index index.html index.htm;
}
通过使用命令创建规则文件来启用 OWASP 核心规则。
sudo nano /usr/local/nginx/conf/modsec_includes.conf
在该文件中,粘贴以下内容。
include modsecurity.conf
include owasp-modsecurity-crs/crs-setup.conf
include owasp-modsecurity-crs/rules/*.conf
保存并关闭该文件。
用以下两个命令导入必要的ModSecurity配置文件。
sudo cp /usr/src/ModSecurity/modsecurity.conf-recommended /usr/local/nginx/conf/modsecurity.conf
sudo cp /usr/src/ModSecurity/unicode.mapping /usr/local/nginx/conf/
启用modsecurity.conf文件中的SecRuleEngine选项,请执行以下命令。
sudo sed -i "s/SecRuleEngine DetectionOnly/SecRuleEngine On/" /usr/local/nginx/conf/modsecurity.conf
现在,我们可以通过执行以下7条命令来添加OWASP ModSecurity核心规则集。
cd /usr/local/nginx/conf
sudo git clone https://github.com/SpiderLabs/owasp-modsecurity-crs.git
sudo cd owasp-modsecurity-crs
sudo mv crs-setup.conf.example crs-setup.conf
sudo cd rules
sudo mv REQUEST-900-EXCLUSION-RULES-BEFORE-CRS.conf.example REQUEST-900-EXCLUSION-RULES-BEFORE-CRS.conf
sudo mv RESPONSE-999-EXCLUSION-RULES-AFTER-CRS.conf.example RESPONSE-999-EXCLUSION-RULES-AFTER-CRS.conf
五、如何为NGINX创建systemd启动文件?
为了使我们能够控制NGINX,我们必须创建一个systemd启动文件。用命令创建该文件。
sudo nano /lib/systemd/system/nginx.service
在文件中,粘贴以下内容。
[Service]
Type=forking
ExecStartPre=/usr/local/nginx/sbin/nginx -t -c /usr/local/nginx/conf/nginx.conf
ExecStart=/usr/local/nginx/sbin/nginx -c /usr/local/nginx/conf/nginx.conf
ExecReload=/usr/local/nginx/sbin/nginx -s reload
KillStop=/usr/local/nginx/sbin/nginx -s stop
KillMode=process
Restart=on-failure
RestartSec=42s
PrivateTmp=true
LimitNOFILE=200000
[Install]
WantedBy=multi-user.target
保存并关闭该文件。
用命令启动NGINX。
sudo systemctl start nginx
使用该命令使Web服务器在启动时启动。
sudo systemctl enable nginx
六、如何测试ModSecurity
我们终于可以测试我们的ModSecurity设置了。为此,我们将使用tail命令来跟踪NGINX的错误日志。
sudo tail -f /usr/local/nginx/logs/error.log
运行该程序后,打开Web浏览器并将其指向:http://SERVER/?param=">。
其中SERVER是NGINX服务器的IP地址或域。返回到tail命令,您应该看到许多“权限被拒绝的错误”。
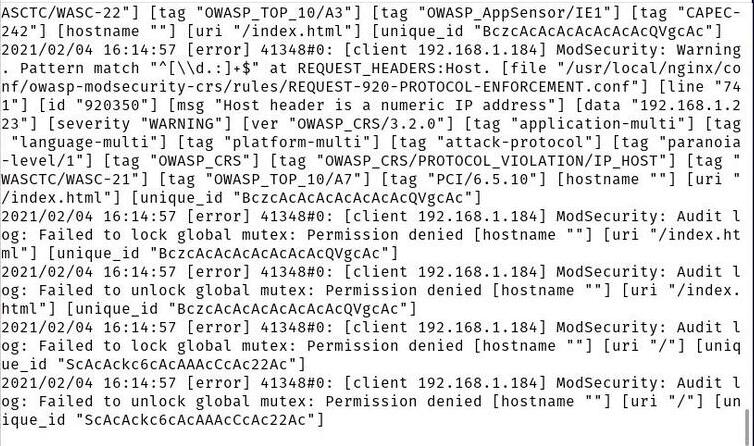
现在您已经在Ubuntu服务器20.04上使用最新版本的NGINX运行ModSecurity了。